

How to Grow an Organic Garden Anywhere: A Step-by-Step Guide
On What You Need to Start Planting, The Hidden Pleasures of Growing Your Own Food, & Mel Bartholomew's Square Foot Gardening (SFG) Method
When I first decided to grow my own food a decade ago, I had no idea what I was getting myself into. I started off with very little understanding and a whole lot of motivation to succeed at this new project—in my first year, I grew over 200 different varieties of edible vegetables, natives and medicinal herbs. Each seed I planted became a new project, leading me down a rabbit hole of never-ending gardener info.
As I studied, tried new things, and made plenty of costly mistakes, I also witnessed an ecosystem spring into existence; gradually at first… then all at once. Butterflies and bees came to visit my six-foot tall blue starflower (also known as borage), rabbits nibbled on lettuce leaves only to leave behind small, round compost deposits, and lime green frogs found refuge under broad kale leaves.

This simple, cedar bed had transformed from a plot of soil to a complex, interconnected habitat full of life. And while I celebrated every little green sprout, I also recognized it as an additional responsibility. A life form that I was just beginning to understand, but really wanted to support, and suddenly defend: from stray pesticides, tropical storms, and inconsiderate passersby.
Gardening quickly turned into a mission (and labor) of love which required my up-front patience and adaptability. Perhaps it’s because I came into traditional gardening methods with a fresh pair of eyes, or maybe it’s because I’m naturally a skeptic—either way, I started to identify several areas where I could improve not only my garden, but also have a positive impact on other individuals and communities growing their own food.
There are so many things I’d like to share with you to aid you in this journey. We will start with what I consider to be the top priority of any growing space.
Your garden soil will become, in many ways, the foundation of your success. The beneficial bacteria and microbes beneath the surface need a little help to create the rich environment that nourishes your plants. Starting with healthy, organic soil is key, and it’s simpler than you might think! If you’re ready to begin your own organic garden, this guide will walk you through everything you need to know to prepare your soil and set the stage for a thriving ecosystem.

The Basics of Square Foot Gardening
Considering that people have been growing their own food for roughly 12,000 years, you might assume the methods haven’t changed much. But about 50 years ago, that began to shift, thanks largely to the work and findings of Mel Bartholomew. A civil engineer who took up gardening as a retirement hobby in 1975, Mel quickly found traditional gardening methods to be shockingly inefficient.
With his engineering expertise, Mel developed a gardening method that could thrive in any garden bed (including tiny backyards or patios), using just one tenth of the water required for row gardening.
Row gardening, while traditional, has several disadvantages. It requires 80% more precious planting space, as plants are arranged in long rows with wide paths in between. This layout demands more effort for planting, watering, and harvesting, which likely contributes to gardening's reputation for being "labor-intensive." Additionally, the bare soil between rows invites more weeds to sprout, leading to frequent weeding. The exposed soil also increases water evaporation, which can lead to soil erosion and necessitate more frequent watering.
Square foot gardening, on the other hand, offers several advantages, especially for those with limited space. By dividing the garden into smaller, manageable sections, it maximizes growing space and allows for a higher yield in a compact area. This method also reduces the need for weeding and conserves water, as plants are grown closely together, shading the soil and helping retain moisture. Square foot gardening promotes healthier plants through efficient use of soil nutrients, and it makes crop rotation and companion planting simpler, encouraging year-round productivity in even the smallest plots.

Mel Bartholomew’s Square Foot Gardening (SFG) is a simple, efficient method that strays from traditional in all the right ways.
Both beginner and advanced gardeners will find its principles easy to apply, and it is effective in nearly every type of outdoor setting. Here’s a quick overview, following by a step-by-step guide on how to get growing fast:
Simple Grid Pattern: SFG uses a 1-foot grid system, with each square acting as a mini-plot for various crops. For instance, one square might hold broccoli, while another can fit 16 radishes, maximizing variety and space even in small areas.
Soil Quality: Mel’s Mix—an equal blend of compost, peat moss, and vermiculite, outlined in further detail below—provides nutrient-rich, moisture-retentive soil that eliminates the need for fertilizers and reduces watering.
Efficient Watering: Close, or high-intensity, planting helps shade the soil, reducing water needs to around 10% of what is used in traditional gardening.
Natural Pest Control & Rotation: Planting different crops in each square encourages natural pest control, while rotating crops and succession planting each season keeps the soil healthy and disease-resistant.
Easy Harvesting: Organized grids make planting several different varieties easy; crops are easy to monitor while harvesting is far more convenient and accessible.
Environmentally Friendly: SFG reduces reliance on synthetic fertilizers and pesticides, promoting biodiversity and creating a healthier ecosystem for plants and pollinators.
Budget Conscious: If you mix your own soil and use the recommended amount of compost, you will not need to purchase additional fertilizer for your garden! Money is saved all throughout the season by requiring less resources and mitigating the need for common garden equipment like rototillers or irrigation.
Preparing Your Garden Bed
Getting started with your organic garden means setting up the right foundation.


1. Choose Your Spot Carefully
Pick a sunny location with at least six hours of direct sunlight daily. Be wary of tree canopies directly above your garden bed; they can start to drop seeds into your bed and create a lot of weeds later on.
Since the sun rises in the east and sets in the west, positioning your garden to maximize morning sunlight can benefit sun-loving plants, while taller plants can be placed on the west side to provide natural shade for those that prefer less intense light.
You’ll also want to consider the availability of a water source nearby, and the general accessibility of your garden area.
A great feature of the SFG system is its flexibility: beds can be set up on a table or in a raised bed, making it easier for those who have difficulty squatting or bending—and they can even be designed for wheelchair accessibility.
Perhaps the location you have available isn’t perfect. That’s okay. Mine wasn’t either! As you can see in the pictures above, there was quite a bit of standing water surrounding my bed. This can attract flying insects and pests, and it also raises the risk of mold or root rot if excess moisture seeps into the garden soil. Since my bed is in a fixed spot in our community garden, I had to find a way to adapt and work alongside nature. We installed some pallet boards over the standing water to create a dry access point and added small trenches around the beds to help with drainage.
Later on, we mulched heavily in these areas (with all-natural, OMRI-certified mulch) and removed the palette boards to create a safe walkway. These simple adjustments made it easier to tend to the garden and kept excess water from becoming an issue.
Remember, every garden spot will have its quirks and challenges. Don’t let that discourage you. Gardening is all about adapting to what nature throws your way and finding creative solutions to make it work. Whether it’s dealing with standing water, limited sunlight, or stubborn soil, there is always a solution. Embrace the imperfections of your space and look for small changes that can make a big difference.


2. Fill with Mel’s Mix
Choosing the right soil mix is crucial for the overall success of your garden. Mel’s Mix covers everything you need to get started. It’s an equal mix of 1/3 blended compost, 1/3 peat moss, and 1/3 coarse vermiculite. See below for an overview of what each of these ingredients are, how to source them, and why they are used.
Invest in quality ingredients for this soil mix to ensure optimal growth. If you’re committed to going fully organic, make sure your garden product sources are organic-certified. Check for certifications like the USDA Organic seal or OMRI (Organic Materials Review Institute) listing, which verify compliance with organic standards.
Always read the ingredient list to avoid synthetic chemicals, and research brands to confirm their commitment to organic practices.
Blended Compost: Enriches soil with essential nutrients, improves its structure, and promotes beneficial microbial activity. Compost also enhances moisture retention and helps plants resist diseases, making it a vital component for a thriving garden. You’ll need at least 5 different types of compost if you are not using fertilizer. If you are using fertilizer, you can get away with 2-3. Examples of good compost include (but are not limited to) worm castings, mushroom compost, leaf mold compost, seaweed, biochar, and organic garden compost mix, which is usually a general-purpose blend of green and brown organic matter. Because all commercial compost is a byproduct from one industry, it’s important to get several different kinds and mix them yourself. Compost can be sourced from local garden centers, municipal compost facilities, farm supply stores, online retailers, and local farms or nurseries.
Peat Moss: Improves soil structure, retains moisture, and creates a loose, airy environment for roots to grow easily, making it especially beneficial in sandy soils. It also adds organic matter that supports beneficial microbes. Peat moss is a natural, nonrenewable material formed from decomposed plants over thousands of years. Due to its limited availability, use peat moss responsibly to get the most out of this valuable resource. Peat moss can be found in home improvement stores, local garden centers, online retailers, and farm and feed stores. Be sure to buy peat moss in 3.9 cubic foot compressed bales, as it is less expensive than the loose bags.
Coarse Vermiculite: A natural mineral derived from mica rock with tiny pockets that hold water while allowing airflow. This unique structure makes the soil loose and friable, enabling roots to grow easily around particles. Vermiculite comes in fine, medium, and coarse grades, with the coarse agricultural grade providing the best moisture retention and aeration. Although vermiculite is now certified asbestos-free and safe to use, it can be challenging to find due to past contamination concerns from one mine. Perlite can easily be used as an alternative. For sourcing, check local nurseries, garden centers, or online greenhouse suppliers. When handling vermiculite, wear gloves and a mask, as it can be dusty; mix outdoors on a calm day for best results.

How to Prepare Your Organic Gardening Soil Mix:
Open bags carefully along the top to reuse for storing any leftover mix. Because the SFG method requires less than half the amount of soil used in traditional gardening, you can reduce the amount of medium being used and reuse leftovers.
Set up a mixing area: spread a large 16x16 tarp near the garden boxes in their final spots and double-check your garden bed’s placement with anyone involved. It’s a hassle to move once you’re done adding your soil, and disturbing the soil later on will hurt the beneficial microbes and bacteria inside. Wear a painter’s mask, and only mix on a calm day to avoid dust.
Prepare your mixing tools, such as a snow shovel, hoe, or rake. Keep a hose with a fine spray setting nearby to reduce dust. Count your bags, confirm necessary quantities, and pour the ingredients onto the tarp without stepping on them.
Roughly mix with your tools, then pull two opposite corners of the tarp to “roll” the mix over onto itself. Rotate 90 degrees and repeat until your soil ingredients are evenly blended and consistent in color.
Moisten the mix! Lightly mist the mix to control dust, but avoid over-wetting it to keep it light and easy to handle. Keep children and pets from playing in or around the mix, and try not to step on it yourself either.
Fill your garden boxes: transfer the prepared mix to each box, lightly misting as you fill; avoid packing it down as it will settle naturally.
Place extra mix in saved bags, turn them inside out if preferred, label, and store dry for future use. Drag the tarp close to additional boxes instead of carrying shovelfuls, to avoid spills and waste.
Lastly, if you are using additional fertilizers, be sure to work it into the top layer of your already mixed soil. This way, nutrients will gradually be watered in to reach the roots as they grow rather than being evenly mixed throughout the soil. This helps ensure that more nutrients are available directly to your plants.
With this combination, your soil will remain loose and friable for years. Keep a sample area in prime condition to show visitors its quality—let them feel the texture and experience the difference!


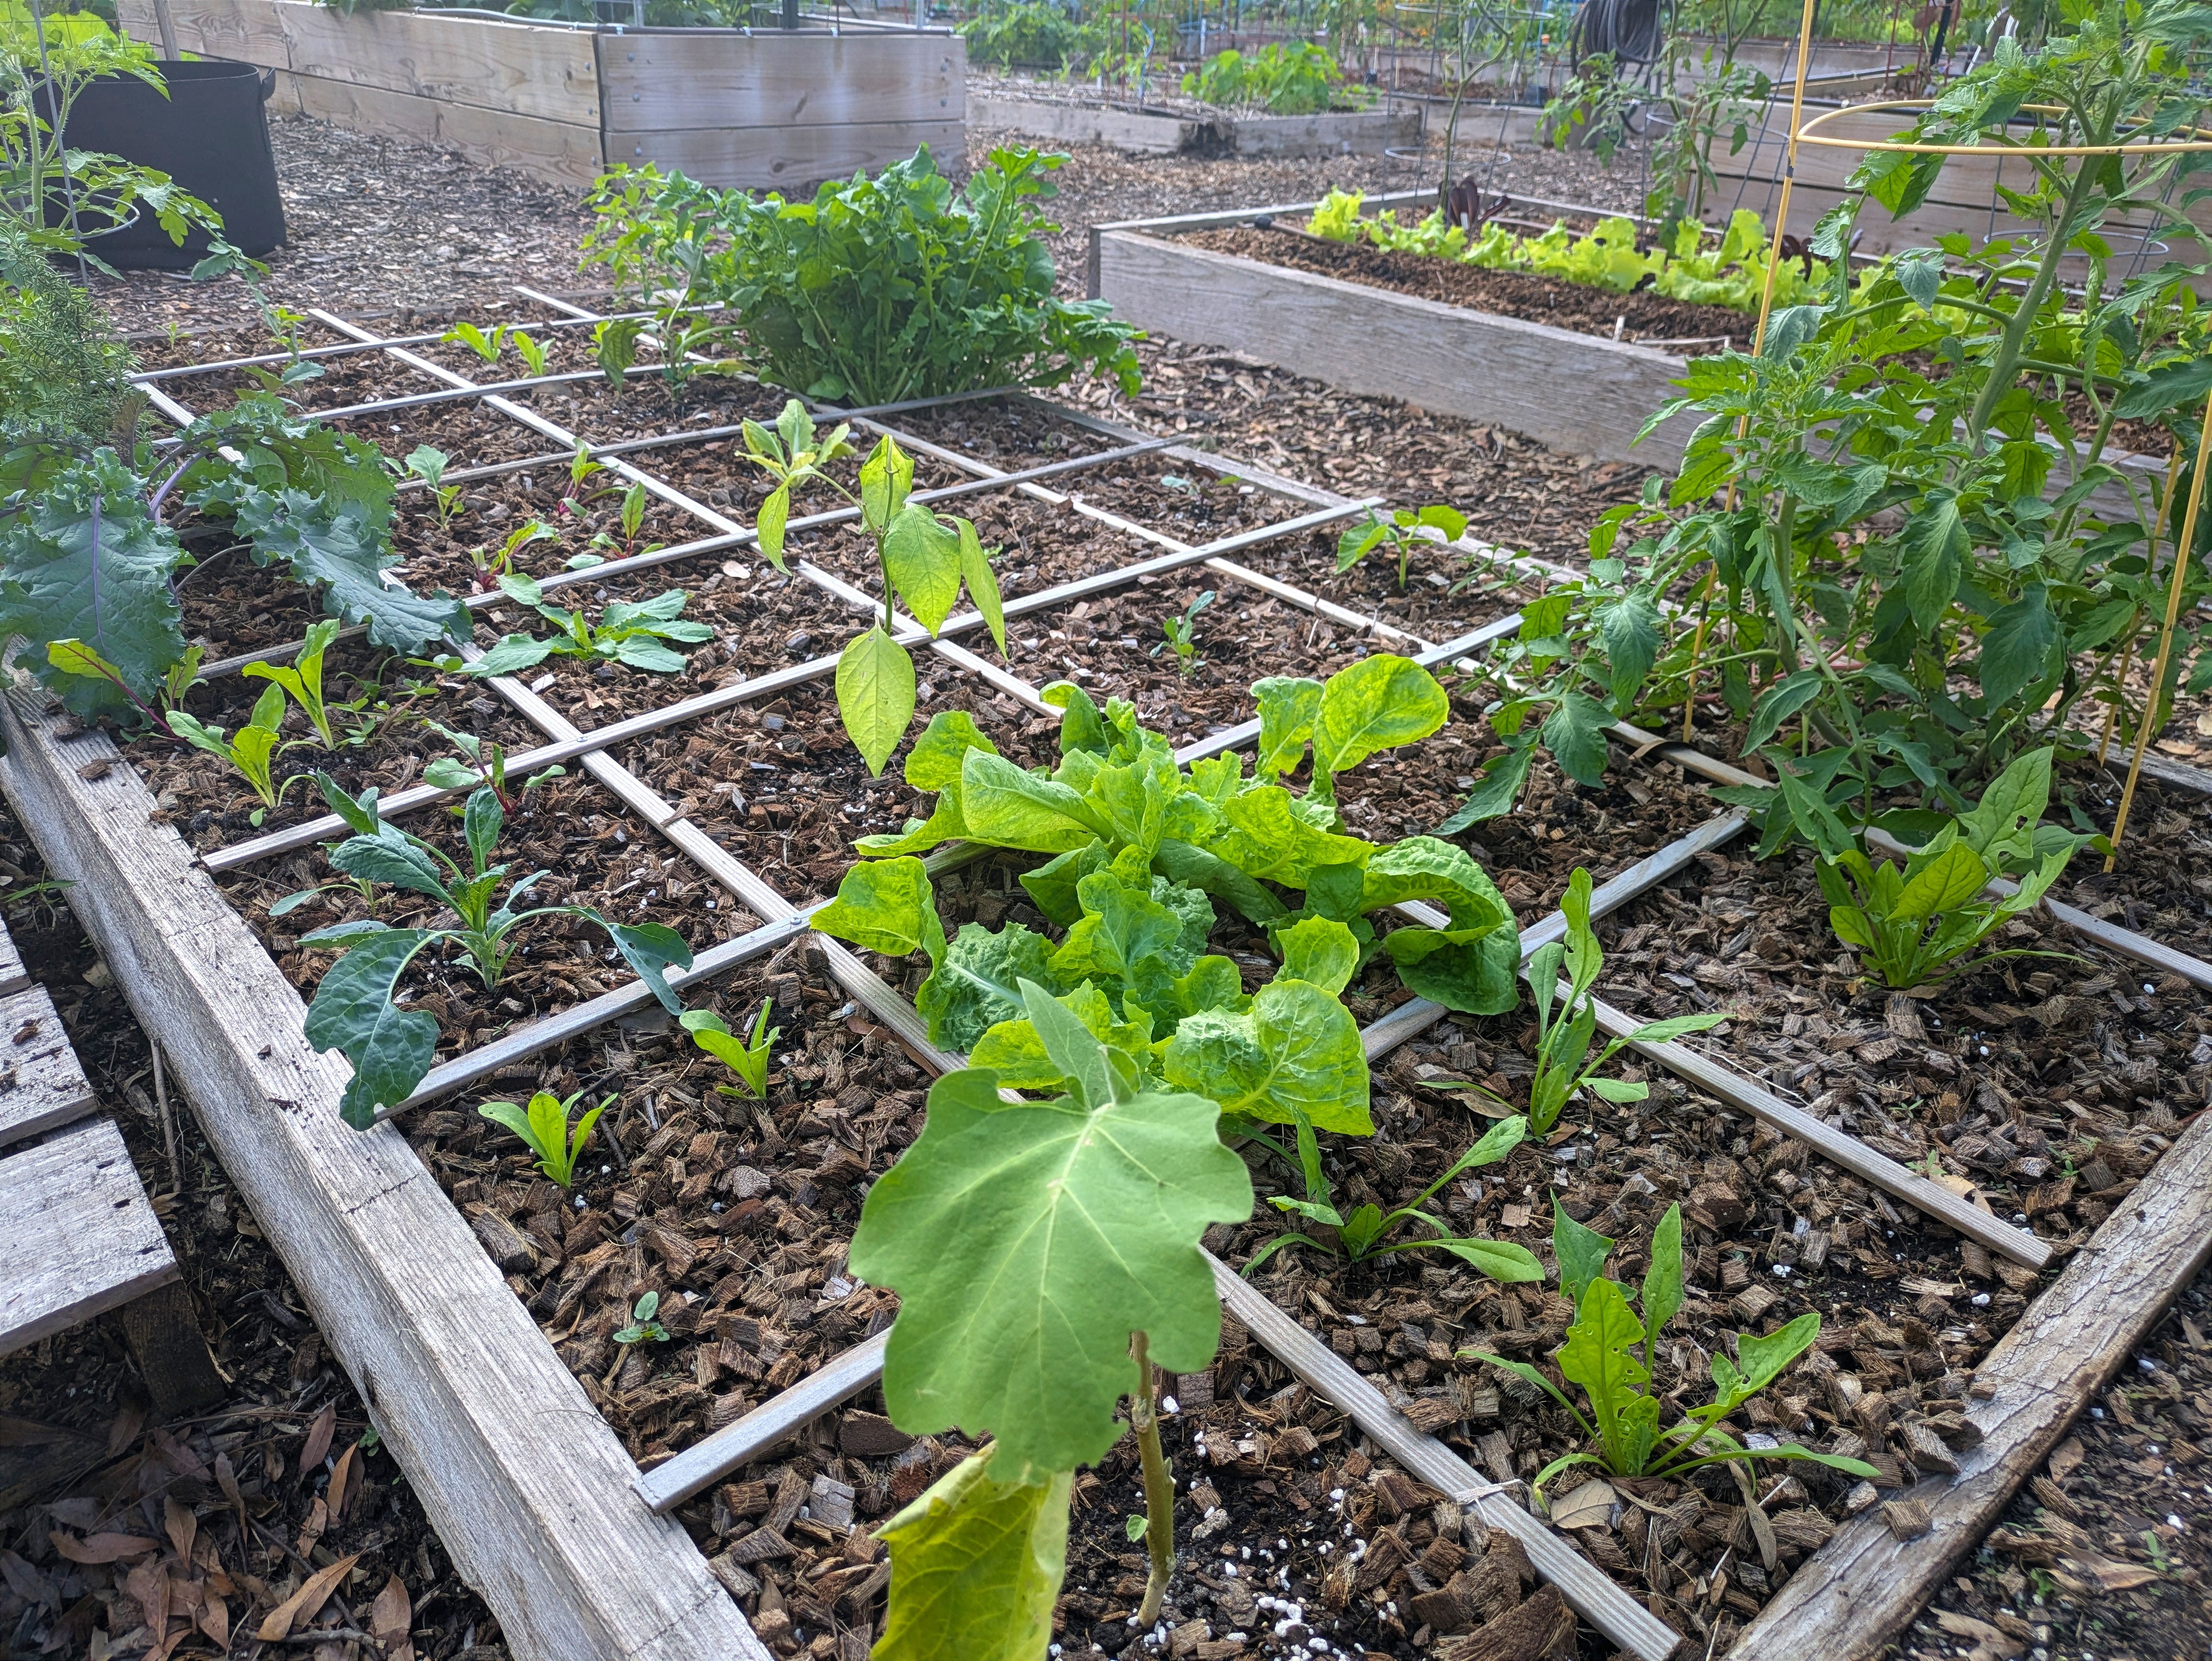
3. Create Your Own Grid
Once you have your raised bed (recommended for SFG), divide it into square-foot sections. You can do this with string, venetian blind slats, lath, or even scrap wood. Your grid does not have to be temporary. It does not need to be constructed with bought materials. It does not need to follow any standard or rule, really, outside of a suggested mindfulness for what it is intended to be used for (dividing space evenly).
Option 1: Venetian Blind Slats
Materials: Find a set of slat-type or Venetian blinds at least 4 feet wide. Thrift shops often have used blinds at a low cost.
Assembly: Cut the strings to separate the slats. Trim them to fit your box, drill holes at the half and quarter points, and secure them with screws, nails, or snap-fasteners.
Wind Solution: Attach the grid to the soil with long galvanized nails at each 12-inch intersection to prevent it from blowing around in windy conditions.
Option 2: Wood Lath
Materials: Wood laths, available at home improvement stores, are typically 4 feet long with square ends and cost less than a quarter each.
Assembly: Lay out the laths and drill holes at 12-inch intervals. Connect them with nuts and bolts or other fasteners.
Rigidity and Attachment: Wood laths are sturdy enough to span from one box side to the other. To prevent shifting, drill a hole in the ends of the two center slats and screw them to the wooden box.
Winter Storage: To protect from rot, unscrew, fold, and hang the grid in a dry place for the winter. Store screws in a plastic bag with the grid for easy access next season.
Option 3: Potential Alternatives
Scrap Wood: Look out for leftover strips from carpentry work or cut your own with a table saw.
String, Fishing Line or Twine: Secure nails or screws along the edges of your garden box at 12-inch intervals and stretch the string across to form a grid.
PVC Pipe: Connect thin PVC pipes (cut to fit the box dimensions) with corner and T-shaped connectors to create a sturdy grid.
Recycled Materials: Leftover garden edging, and chopsticks—or any thin, rigid material that won’t leach chemicals into your soil or degrade quickly—can be used to create your grid pattern.
Stewardship of the Earth (A Final Note)
Now that you have your raised bed, square-foot grid, and organic garden soil, you're ready to transform your space into a thriving, productive garden. With the foundational elements in place, you’re not just growing plants—you’re cultivating an ecosystem that will bring you fresh, homegrown produce and support local pollinators and biodiversity.
This garden will not only nourish you, it will also teach you to problem-solve and appreciate the delicate balance found in all life. Growing your own organic food is a lesson plan in patience, compassion, and sustainability—and it doesn't take an entire season to harvest from the teachable moments your garden has to offer you.
Want to dig deeper? Drop any questions, comments or suggestions you have below!
In the next installment of our #OrganicGardening series, we’ll dive into the details of planting your seeds.
The Seed Edition will cover topics like spacing guidelines, proper watering techniques, organic pest control, and how to use succession planting and crop rotation to get the most of out your harvest. Each new connection you make with nature allows for a simpler and more productive garden, helping you to keep your plants—and you—thriving!