New Tricks for Old Trail Dogs: How Seasoned Hikers Can Master AllTrails
Learn to use the AllTrails app like a pro. Avoid common pitfalls and get tips on planning, custom mapping, and on-trail navigation to level up your next hike.
It was barely past dawn when our boots hit the Cove Mountain Trail just outside Gatlinburg. Mist lingered in pockets along the Great Smoky Mountains, and our crew – four seasoned hikers plus one eager freshie – was braced for the full 16.1-mile challenge. We’d stocked up on pancakes in Sevierville, secured our $5 parking tags for Great Smoky Mountains National Park, and double-checked our packs. In other words, we thought we had everything covered. But a mile or two into the hike, approaching the well-loved Laurel Falls, Omar’s furrowed brow hinted at trouble.
“Where’s the turnoff for the rest of the trail?” he muttered, flipping through a folded topo map. The rest of us exchanged glances. The route had seemed straightforward enough on AllTrails; yet here we were, caught off-guard at a popular waterfall viewpoint, surrounded by casual day-hikers snapping selfies. It was hardly the isolated adventure we’d anticipated. Quickly, I opened the AllTrails app, pulling up our loop in real-time. The blinking blue GPS dot placed us precisely at the falls, with a discreet trail marker hidden behind a curtain of rhododendron leaves indicating our onward route. “Found it!” I grinned, as Omar shook his head with a half-smile.
This little episode was a wake-up call: even seasoned hikers can underestimate the nuances of navigating with AllTrails. While continuing our journey along Cove Mountain Trail, winding toward Cataract Falls and onward through the dense forests of the Smokies, we began to appreciate fully the app’s capabilities. By the end of the full 16-mile loop - legs tired, spirits buoyant - Omar conceded (reluctantly) that perhaps this digital companion had earned a spot alongside his treasured paper maps.






Below, I’m spilling the hard-earned tips from that day – and years of other adventures – on how to use AllTrails correctly, especially if you’re a mileage-hardened hiker who’s new to hiking apps. Think of it as a guide to avoid the common missteps seasoned hikers make when underestimating this digital tool. Let’s dive in (before Omar prints out another 12-page trip plan).
AllTrails: The Hiker’s New Best Friend (Yes, Even for Old-Timers)
If you’ve spent decades bagging peaks or logging long trail days without any app, you might wonder what the fuss is about. Well, AllTrails has become the go-to trail companion for millions – and for good reason. As of late 2024, over 75 million outdoor enthusiasts use AllTrails to connect with nature. The app’s database boasts some 450,000 trail maps worldwide, complete with crowdsourced reviews and photos. In other words, odds are that even your secret local loop or that obscure backcountry route is indexed in there somewhere.
AllTrails isn’t just popular, it’s also trusted. The platform has racked up over 1 million 5-star reviews, earning a reputation as one of the world’s most trusted outdoor platforms. It even survived the pandemic hiking boom and came out stronger – in a recent Inc. Magazine piece, AllTrails was fittingly described as the “gateway drug” that gets people outside. Don’t let that scare you off: for veterans of the trail, AllTrails can be a powerful ally rather than a crutch. It’s like adding a high-tech tool to your hiking arsenal – one that can enhance (not replace) your hard-won wilderness savvy.
Why bother if you already know how to navigate?
Think of AllTrails as your hyper-efficient research assistant and on-trail guide. It aggregates up-to-date information on trail conditions, helps you plan routes on a laptop and sync them to your phone, and provides GPS tracking to keep you on course. The key is knowing which features to use (and how), so you don’t fall into the traps that many experienced hikers do when first using the app. Let’s break down those features and some trade secrets to get the most out of AllTrails.
Plan and Organize with Lists (Omar Approves)
One feature we seasoned hikers often overlook is the humble Lists. If you’re like Omar, you might be used to planning hikes via spreadsheets or dog-eared guidebooks. AllTrails Lists can simplify that process – and even make it fun.
Lists let you save and organize trails into custom collections.
Found an interesting trail you want to tackle later? Add it to a list. Planning a multi-hike trip? Create a list for it (e.g., “Smokies Spring 2025”) and save all your target trails there. During our Gatlinburg trip, we could have saved ourselves a few headaches by putting all our planned hikes (Cove Mountain, Chimney Tops, Mt. LeConte, etc.) into a shared list ahead of time for easy reference.
Creating a list is straightforward: in the app, tap ‘Saved’ at the bottom, then go to the ‘Lists’ tab and hit ‘Create new list’. Name it, add trails, done. You can also add any trail to your default Favorites list with a tap of the heart. According to AllTrails, adding trails to your favorites or custom lists is quick and easy – and a great way to organize future adventures. In fact, the app’s own help center encourages making lists for things like specific trip plans or goals, noting that “Lists are a great way to organize trails and a fun way to share your plans with friends!”. (Sharing is optional – you can keep lists private or only share with select people. More on privacy soon.)
For example, AllTrails itself publishes curated lists to inspire users. Their recently announced “25 Trails to Explore in 2025” list spans the globe – from chasing bioluminescent insects on South Carolina’s Congaree Firefly Trail to trekking a high alpine route in the Swiss Alps. You can follow such official lists or just use them as inspiration to build your own bucket list. The point is, Lists help you plan like a pro. Omar, notorious for his binder of printed hike notes, now begrudgingly admits that having our itinerary neatly organized in the AllTrails app (and synced to everyone’s devices) beats emailing PDFs around.
Speaking of syncing – a common question is whether your planning on the computer carries over to your phone. The answer is yes.
AllTrails syncs seamlessly between desktop and mobile.
You can scout trails and create maps on the AllTrails website from the comfort of your big-screen monitor, and those changes will instantly reflect in your app. During planning, I often flip open my laptop to draw routes or read long reviews, then later access all that info on my phone when it’s go time. This app-to-computer collaboration is clutch. No more fumbling with printouts at the trailhead – just pull up your saved list or map on your phone.

Know Before You Go: Trail Details Matter
Experienced hikers pride themselves on knowing trail mileage and elevation like the back of their hand. But when using AllTrails (or any app), it’s vital to pay attention to the on-screen details — and not make assumptions. Consider this your pre-hike checklist in the digital age.
First, always double-check the trail basics displayed in AllTrails: total distance, route type, and elevation gain. These are usually right below the trail name. One of the biggest mistakes newbies and veterans alike make is not realizing, for example, that a trail is an out-and-back. In AllTrails, a trail listed as “5 miles, out & back” means it’s 2.5 miles each way (5 miles total). But if you only read “5 miles” and assume a loop, you’re in for a surprise five miles in when you have to turn around and do it again. Don’t ask how I know. As Outdoors.com notes, many beginners (and, ahem, some seasoned folks on autopilot) “don’t quite realize what they’re getting themselves into” and lack a full understanding of specs like distance, trail type, and elevation gain. Take a moment to digest those specs.
“One of the most crucial mistakes I see beginners make is that they don’t quite realize what they’re getting themselves into. It’s important to have a full understanding of specs like distance, type of trail, and elevation gain.”
The quote above might target newcomers, but the wisdom applies universally. On our Smokies loop, we initially glossed over critical details, seeing "16.1 miles" on AllTrails and assuming familiarity with similar trails. But deeper inspection would have shown us that the first couple of miles toward Laurel Falls were relatively easy and popular, while the remainder featured significant climbing, totaling nearly 3,000 feet of elevation gain. That elevation gain - most of it after the heavily trafficked falls - shouldn't have been an afterthought. Context is crucial, even for the experienced.
Next, don’t rely blindly on AllTrails’ difficulty rating.
The app classifies trails as Easy, Moderate, or Hard, but those labels can be notoriously subjective. In fact, one frequent complaint (even among AllTrails fans) is that the difficulty ratings are a bit too broad. Travel writer William O’Connor quipped that he felt misled by the app’s ratings – “Two ‘hard’ hikes turned out to be cakewalks,” one hiker complained in his survey of users. The consensus was that you have to ignore the difficulty label or take it with a grain of salt. In AllTrails’ defense, difficulty can be relative (a “Hard” trail for a novice might feel moderate to a marathon runner). So, instead of trusting the color-coded icon alone, read the trail description and recent reviews. Look for clues: Are people mentioning steep scrambles? Was that “Moderate” trail actually super muddy and slow-going? The real intel lives in those user reviews and photos.
While you’re at it, always check for recent trail conditions.
AllTrails is great because hikers post updates about downed trees, closed sections, or anything noteworthy. For example, if there’s a note like “Bridge out at mile 2, had to wade across creek,” you’ll know what’s coming. Bear Grylls’s team emphasizes using resources and apps for updated trail conditions so you’re not caught off guard by, say, lingering snow or mud. A quick scroll through recent comments can save you from unpleasant surprises.
And here’s a pro tip: scan the “Fees & Permits” info on the trail page. AllTrails often notes if a park pass or permit is required. On the Cove Mountain Trail page, it clearly stated that a paid parking tag is required for stops over 15 minute – crucial info in the Smokies, where parking without a tag could get you fined. Make it a habit to glance at that section so you’re squared away with regulations. (Remember how proud we were having bought our tags ahead of time? Gold star for us on that one, at least.)
Finally, interpret the elevation profile if available. AllTrails will usually show a little graph of elevation gain over distance. If you see a sudden spike on the graph, be mentally prepared for a hill climb at that point. One rule of thumb I use: ~1,000 feet of gain per mile is steep. Anything gentler than that is generally manageable. On a topo map, that steep section would show tightly packed contour lines – and indeed, AllTrails’ topo maps will reflect that too if you use the right layer.
The bottom line: before you hit “Start” on your hike, take a minute to read the fine print in AllTrails. Seasoned hikers might feel they can wing it, but a brief digital reconnaissance can confirm (or correct) what you think you know about the trail.
Map Matters: Mastering Map Types and Smart Routing
One of the coolest aspects of AllTrails is the variety of Map Types and the ability to create your own routes. Yet many experienced hikers never venture beyond the default map view. If you’re planning anything complex – or just geek out on maps like I do – you’ll want to tap into these features.
AllTrails offers several map layers to choose from, each with different info.
The default AllTrails layer is a custom topographic map with trail names, mileage markers, contour lines, and more. It’s a great all-around map. But sometimes, switching to a different map type can reveal things the default doesn’t.
For instance, the Satellite view can help you see terrain or landmarks from above (useful if you want to identify a clearing or rock face). There’s also a plain Road map, an old-school USGS Topographic map, and even OpenStreetMap-based layers for international detail. Don’t worry about memorizing them all; just know that if your map isn’t showing something clearly, a quick toggle might. On any trail map screen, look for the map layers icon (usually a little stack or layers symbol) to change the base map.
Then there are Map Details, which are overlays you can toggle on/off to add extra info. My personal favorites are the waypoints and photos layers. Turning on waypoints will display points of interest like campgrounds, trail junctions, or summits on the map – super handy to get a sense of what’s along the route. Enabling the photos layer plasters little photo thumbnails on the map wherever someone took a picture. It’s like a sneak peek of what views or obstacles you’ll encounter at various spots (if you’re into that kind of thing, that is).
Now, let’s talk about the Map Creator and the magic of Smart Routing.
This is where AllTrails truly shines for planners. If you’ve ever bushwhacked your own path or strung together multiple trails into a custom route, you’ll appreciate this tool. On the AllTrails website (it’s desktop-only), you can create custom maps by drawing your route. You can freehand draw, but the genius part is Smart Routing: when toggled on, your drawn line will automatically snap to known trails and pathways. Essentially, AllTrails does the routing for you, following the best path for your chosen activity.
We used Smart Routing when brainstorming a longer route linking Cove Mountain Trail with neighboring paths. With a few clicks, I traced from the fire tower down to a different trailhead, and AllTrails snapped my line onto the connecting Little Greenbriar Trail perfectly, calculating the extra distance and elevation in seconds. No guesswork or squiggly lines – it was like having a trail editor that “knew” the official routes. The result? A neat custom map showing a big lollipop loop. I even added a waypoint for “Lunch Spot” at an overlook.

The image above is an example of AllTrails’ Map Creator in action. On the left, you set your route preferences (we set ours to “Hiking” with Smart Routing on). On the map, the red line is our drawn route snapping along real trails, and at the bottom, you can see the elevation profile and stats updating.
Once you Save your custom map, it syncs to your phone under Saved → My Maps. From there, you can pull it up on the trail (even if offline, provided you saved the area map) and follow it just like a regular trail.
For an experienced hiker, this feature is gold. You can plan bail-out shortcuts, alternate routes, or combine trails into one seamless journey. It basically brings your paper-map scribbles into a GPS-friendly format. And if a trail isn’t in AllTrails’ database yet, you could draw it in manually – though for that, you might also consider contributing a new trail to the community (if it’s legit and publicly accessible).
Navigate Like a Trailblazer (Tech Tips for On-Trail Navigation)
Once you’ve done all the prep work, it’s time to actually hit the trail and Navigate. This is where the rubber (or Vibram sole) meets the road. Using AllTrails’ Navigate feature correctly can turn your phone into a trusty guide, but there are a few things to keep in mind on the trail.
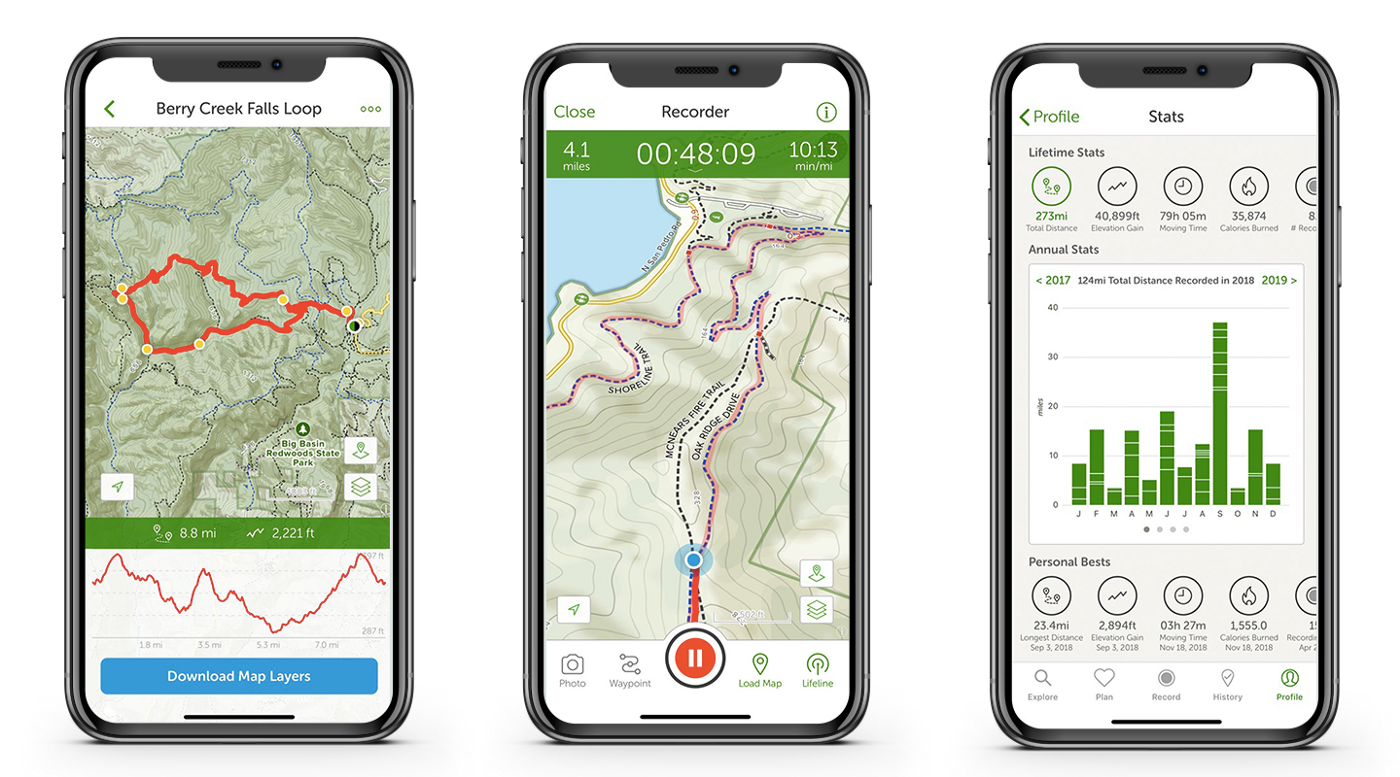
When you arrive at the trailhead, open up your saved trail or custom map in the app. You’ll typically see a ‘Navigate’ or ‘Start’ button. Tapping that will start the GPS tracking and show your progress. AllTrails will display the route – usually as a red or green line – and your current location as the famous little blue dot. As you move, the blue dot moves. Simple, right?
Need to save battery life while navigating? Check out this helpful AllTrails guide on how to maximize efficiency while out on the trail!
A couple of nuances: If you loaded an AllTrails verified trail and hit Start, the app might change the trail’s color to highlight the part you’ve completed versus not. For example, the section you have hiked might turn blue behind you, while the remaining trail stays green. This gives you a visual of how far along you are. If you’re recording your hike (which you should – it’ll save to your profile for later), you’ll also see stats like distance, time, and elevation climbed as you go.
Now, a word of caution from personal experience: It’s easy to get glued to that screen, especially when you see your dot drifting around a switchback. But don’t forget to look up! On that morning in Gatlinburg, we fell into the trap of staring at our phones trying to match the map to reality, when the obvious signpost was right in front of us. AllTrails is an aid, not a substitute for situational awareness. Use the app to confirm your direction at confusing junctions, or to navigate in low-visibility conditions, but keep your senses tuned to the environment.
If you have AllTrails’ pro subscription (AllTrails+), be sure to download the map for offline use before you lose cell service. Even without cell signal, GPS on your phone will still work and show the blue dot on the map – but only if the map is stored offline. Think of it as caching the area. Many a seasoned hiker who scoffed at carrying a paper map has learned this the hard way when deep in the woods with “No Service” and a blank AllTrails map tile. Don’t be that person – download the map ahead or carry a backup map.
Another useful on-trail feature: the Navigate drawer.
If you swipe up on the bottom panel in Navigate mode, you can access options like adding waypoints on the fly (maybe you want to mark that sweet backcountry campsite you found), or checking coordinates, and even switching the map type mid-hike if needed. These little tools can enhance your navigation experience, but they’re optional. At minimum, the big win of Navigate mode is keeping you on the right path and tracking your trek.
And remember, using AllTrails doesn’t mean you have to abandon your compass or innate sense of direction. It’s okay to use both! For instance, when we were descending Cove Mountain, we lost the trail briefly in a leafy section (blame all those beautiful autumn leaves covering the footbed). Instead of panicking, we checked the app – the blue dot showed we were a tad off the red line. A quick correction and we were back on track. In the old days, we’d have done the same with map and compass triangulation. The spirit of navigation is the same; the tools have just evolved.
Privacy Settings: Share Your Adventure (On Your Terms)
By the end of a hike, I often have a neat digital breadcrumb trail of where we went, plus photos and notes. AllTrails will automatically save your activity if you recorded it, and you might be tempted to share it – or not. Here’s where privacy settings come into play, and it’s something even savvy hikers might not think about initially.
AllTrails gives you control over who can see your profile and content. You can keep everything totally private, share only with followers, or make your profile public for any AllTrails user to see. By default, if you never tweak it, some of your stuff might be public. Experienced hikers who value a bit of secrecy (maybe you don’t want to broadcast your secret fishing spot or that off-trail shortcut) should definitely review these settings.
In your account privacy options, you can set defaults for various content types: your completed trails, recorded activities, maps, lists, etc. For example, I set my Activities to “Followers only,” so only people I’ve approved can see my hike tracks. You might choose “Only me” if you prefer to keep a low profile altogether. Meanwhile, I leave my trail reviews public because sharing conditions and tips helps the community (and doesn’t give away any personal info) – that’s the beauty of crowd-sourced knowledge.
If you hike with a group and want to share a specific trip with them, you don’t have to make everything public. AllTrails allows you to share individual links to a trail, list, or map. So for our group, I made our “Smokies Trip” list shareable via a secret link that I sent only to my friends. That way they could view the list and maps without me exposing it to the whole AllTrails universe.
Take a minute to explore the privacy settings in the app (Profile → Settings gear → Privacy). It’s worth ensuring you’re comfortable with what you’re sharing. As AllTrails’ help center puts it, they offer a range of settings “to help you control who can view your content”. You’re in charge here. So whether you want to become the next AllTrails influencer with a public profile, or you’re more like Omar – guarding your GPX files like state secrets – you can adjust accordingly.
Verified Trails vs. User Contributions: Understanding the Source
Ever wonder how all those trails got into AllTrails in the first place? It’s a mix of professional curation and community contribution. Understanding this will help you gauge the reliability of the info you see for any given trail.
Verified Trails (also called curated content) are routes that the AllTrails team has vetted and added themselves. These often correspond to official trails in parks, with accurate names, distances, and descriptions. When you search the app, the results are typically these verified trails – so you can trust that, say, the “Cove Mountain Trail” we did is indeed the established trail and not some rando’s backyard path.
AllTrails had over 200,000 such trail guides published by early 2021, and the number is much higher now. They even have a crew of global trail experts reviewing suggestions submitted by the community. So the platform’s curated database is quite robust.
However, the app also leverages the power of community.
Users (like you and me) can add new trails that might be missing. For example, if there’s a local trail not in AllTrails yet, you can map it and submit it. This is awesome for expanding the map, but it does mean not everything in AllTrails is 100% verified by staff. Occasionally you’ll find a route that’s essentially a user’s recorded track uploaded as a “trail.” Most of the time it’s fine – maybe a lesser-known path that just hasn’t been officially catalogued. But sometimes it could be a bushwhack or social trail that isn’t an official trail at all.
There’s a bit of crowd wisdom needed here. Check how many people have done a trail and what they say. If a trail has zero reviews and a weird name like “John’s Secret Shortcut,” you might be looking at a user-added path that few have tried. One hiking blog pointed out that bad AllTrails info can include “bushwhacks and herd paths passed off as actual designated trails” or even trails crossing private property misrepresented as public. While AllTrails tries to police this, it’s ultimately on us hikers to use common sense. If something seems off on the map, cross-reference with park maps or other sources.
The good news is, AllTrails clearly marks verified routes when you load them in Navigate, and they award a “Verified Completed” badge only if you stick to the official route. That’s their way of encouraging people to follow the known trail rather than wander off-track.
In summary: trust the main trails you find on AllTrails, but be a little cautious of any oddball paths. Embrace the community contributions, but verify critical info if you’re venturing somewhere truly obscure. It’s the same as hearing a tip from a fellow hiker – 99% of the time it’s great info, 1% of the time you raise an eyebrow and double-check.
The Next Adventure (Subscribe for the Inside Scoop)
By the end of our Cove Mountain hike, our group was a little wiser. We had navigated via AllTrails, learned to poke around the app for trail insights, and even Omar had to concede that a smartphone might have a place in his pack. Over post-hike burgers in Gatlinburg, we were already planning our next outing – this time, armed with a shiny new AllTrails list and perhaps fewer printouts in Omar’s clipboard.
I’ll let you in on a secret: there’s a big hike coming at the tail end of this summer. This one’s a bucket-list solo trek—just me, my gear, and maybe a bit of bravery at higher altitude. I won’t spill all the details yet (gotta build the suspense!), but I can hint that it involves an airplane ticket and some serious elevation. Will AllTrails be part of my trail toolkit for this epic journey? Absolutely. Subscribers to Type Two Fun will get exclusive play-by-play updates, location reveals, and behind-the-scenes glimpses when the time comes.
And if you found this guide useful, please consider sharing it with your favorite hiking buddies. Let’s keep the community growing, informed, and ready for whatever trails life throws our way.
After all, the only thing better than learning from your own mistakes is helping others not repeat them.
Happy trails, and see you out there on the next summit!


